Showing posts with label newbies. Show all posts

Friday, 7 December 2012

Updated: MP3 files in Debian

A lot of new users move from Ubuntu to another Debian based distro to limit the ammount of change they experience. But often can be a bit daunted by the challenges that Ubuntu made easy for them. One such is music files in MP3 format.

Whilst I personally use Ogg Vorbis and would encourage all others to, I am realistic that a lot of people still want to use their MP3 files and even build up their collection.

*If you are unsure what the term "as root" means then simply add sudo before each command that requires root privileges, you will be required to enter your password as sudo is a powerful tool*

Playing MP3 files

For playing MP3 files, the quickest method is to download VLC player. This is available from the software repositories from the majority of distros. This can be installed very easily:

1. Open the terminal

2. As root type: apt-get install vlc

This now gives you a player.

Ripping CDs to MP3 format

Should you want to rip your CDs to MP3 format then we still have another few steps to take.

1. Open the terminal

2. As root type: apt-get install sound-juicer

This gives a program that will rip the music from a CD and save it onto the computer. We can load it up from the main menu (usually listed under the multimedia or sound and video), called Audio CD Extractor.
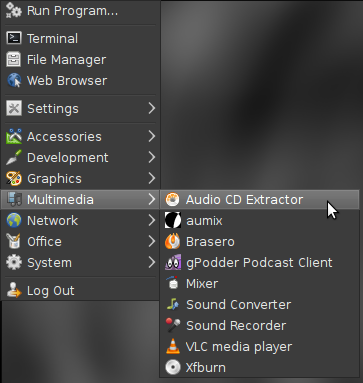


If we open this up and click on edit and preferences we should be greeted by a window as shown below:
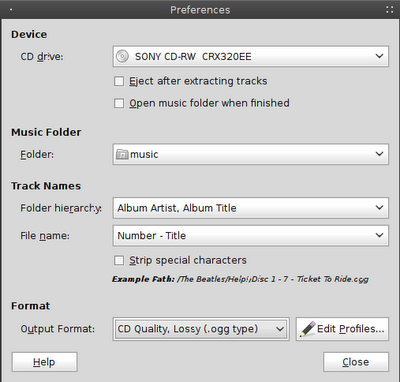


Down near the bottom of the window we should see Output Format, this by default is set to CD Qua;ity, Lossy (.ogg type). At this point if we click on this it will not give us the option of MP3. We still have a few more things to do.

The package we need is not available in the Debian repos due to Debian's commitment to free software. But we can add this. We need to go back to our terminal.

3. As root type: nano /etc/apt/sources.list (if you are met with the message unknown command nano, then you can retype the command replacing nano with gedit)

4. Decide what repos you would like to add:

Stable: deb ftp://ftp.deb-multimedia.org stable main non-free
Testing: deb ftp://ftp.deb-multimedia.org testing main non-free
Unstable: deb ftp://ftp.deb-multimedia.org sid main non-free

Add only one of the above choices, just type the part in bold to the end of document.

5. Exit the file by pressing Ctrl + X, it will then ask you if you wish to save press y and then hit return twice.

This will add the repos to our system, but we also need to have the keyring before the repos will work.

6. Download the Debian Multimedia keyring from here.

7. Navigate to the directory and, as root, type: dpkg -i debian-multimedia-keyring*.deb

8. as root, type: apt-get update

9. as root, type: apt-get install gstreamer0.10-lame gstreamer0.10-plugins-ugly

That's it.

To check it has worked open up Audio CD Extractor again, click on edit and preferences. This time when we click on Output Format, MP3 should be an option.

Enjoy your music.

Sunday, 29 May 2011

Simply Mepis 11: simple enough?

Mepis was one of the distros that I had not tried until very recently. It was often described as the distro for newbies before Ubuntu was around. With Ubuntu's move to Unity and a lot of other distros embracing Gnome 3, more and more users are looking to other, more traditional desktop environments, such as XFCE and KDE.

Mepis uses KDE as it's choice of desktop environment and is intended to work 'out of the box', which is not the norm for a KDE distro. Upon loading my graphics card, Nvidia GeForce 6200 AGP, worked without any tweaking; an impressive feat by any distros' standards. I was able to get the extra effects working straight away. This was the experience with all of my hardware; inlcuding my microphone and webcam. The black and blue theme of the distro looks nice and modern, very appealing to the newbie switching from Windows for the first time.


Some of the stickier points of a Linux distro for a newbie have been addressed, flash and Java come pre-installed, DVDs and MP3 files play without any need for tweaking. There is a good range of software including VLC and Amarok (media players), Libre Office suite, Dolphin, Kopete (instant messaging client), Inkscape and the GIMP. Some exclusions are noticeable, no software has been pre-installed for micro-blogging or torrents. In my opinion these are some essential user tools that most users expect to be present. With such option as Choqok and Ktorrent available it does baffle me as to the exclusion of these applications.

This brings me onto another point in need of development: installing software. Mepis is aimed at newbies, but only includes Synaptic as a graphical package manager. This is the one significant thing this distro lacks: an equivalent of the Software Centre that Canonical provides in it's Ubuntu distro. Synaptic is not a tool for a newbie user, whilst I personally use the command line tool aptitude (which I had to download using the command sudo apt-get install aptitude) this is not ideal for the new user.

Firefox 4 is the pre-installed browser of choice in Mepis 11. The odd thing about this is that by default the page opens up to a blank screen (shown below). Most users like to see something when they load a browser, even if it's just to show that their internet connection is working. I would like to see the startup page being linked to Mepis or a search engine, but a blank page, in my opinion, isn't the best option.

However these issues aside, Mepis is a very solid ditro, with a lot of features that work out of the box, this makes it very difficult to pass up as a good newbie distro. No tinkering to get the basics done, youtube etc will work without any tinkering. This approach may not win the support of the puritan freedom lovers, but this isn't the target audience of Mepis. However the lack of a software centre really does hurt the newbie appeal of this distro. Highly recommended, but make sure there is a Linux user nearby to help setup the system.


Sunday, 27 February 2011

MP3 files in Debian

A lot of new users move from Ubuntu to another Debian based distro to limit the ammount of change they experience. But often can be a bit daunted by the challenges that Ubuntu made easy for them. One such is music files in MP3 format.

Whilst I personally use Ogg Vorbis and would encourage all others to, I am realistic that a lot of people still want to use their MP3 files and even build up their collection.

*If you are unsure what the term "as root" means then simply add sudo before each command that requires root privileges, you will be required to enter your password as sudo is a powerful tool*

Playing MP3 files

For playing MP3 files, the quickest method is to download VLC player. This is available from the software repositories from the majority of distros. This can be installed very easily:

1. Open the terminal

2. As root type: apt-get install vlc

This now gives you a player.

Ripping CDs to MP3 format

Should you want to rip your CDs to MP3 format then we still have another few steps to take.

1. Open the terminal

2. As root type: apt-get install sound-juicer

This gives a program that will rip the music from a CD and save it onto the computer. We can load it up from the main menu (usually listed under the multimedia or sound and video), called Audio CD Extractor.


If we open this up and click on edit and preferences we should be greeted by a window as shown below:


Down near the bottom of the window we should see Output Format, this by default is set to CD Qua;ity, Lossy (.ogg type). At this point if we click on this it will not give us the option of MP3. We still have a few more things to do.

The package we need is not available in the Debian repos due to Debian's commitment to free software. But we can add this. We need to go back to our terminal.

3. As root type: nano /etc/apt/sources.list (if you are met with the message unknown command nano, then you can retype the command replacing nano with gedit)

4. Decide what repos you would like to add:

Stable: deb ftp://ftp.debian-multimedia.org stable main non-free
Testing: deb ftp://ftp.debian-multimedia.org testing main non-free
Unstable: deb ftp://ftp.debian-multimedia.org sid main non-free

Add only one of the above choices, just type the part in bold to the end of document.

5. Exit the file by pressing Ctrl + X, it will then ask you if you wish to save press y and then hit return twice.

This will add the repos to our system, but we also need to have the keyring before the repos will work.

6. Download the Debian Multimedia keyring from here.

7. Navigate to the directory and, as root, type: dpkg -i debian-multimedia-keyring*.deb

8. as root, type: apt-get update

9. as root, type: apt-get install gstreamer0.10-lame gstreamer0.10-plugins-ugly

That's it.

To check it has worked open up Audio CD Extractor again, click on edit and preferences. This time when we click on Output Format, MP3 should be an option.

Enjoy your music.

Saturday, 26 February 2011

Formatting a USB pen drive with the Command Line

The vast majority of users today are probably wandering why I would even consider writing a 'how to' for formatting anything from the command line. The vast majority of distros come with gparted installed and that is an easier option to format any drive with the added convenience of a nice graphical front end.

However for those users who like to test out new distros on a regular basis, a USB pen drive is now the preferred option to boot into a live environment. Why? Well for starters programs like Unetbootin make it very easy to put a live distro onto a pen drive. This can be run, booted straight from the stick, without ever having the need to burn a CD. After testing and/or installing the distro the drive can be reused, unlike the CD which may be used as a coaster before ending up in the bin.

Some programs, when they put the distro onto the pen drive, trick the computer into thinking that the pen drive is a CD. It works fine for testing the distro, but when it comes to wiping it you are unable to do it from the file manager (CDs are read only) and gparted will not format it (it does drives not CDs). So your left with a pen drive that behaves like it can't be altered, but this is where the command line is a useful tool.

This will wipe all the data off the pen stick, for safety reasons I would strongly advise disconnecting any other external USB hard drives or pen sticks at this point.

First of all you need to find out the stick is listed as
1. open up the terminal

2. type: fdisk -l

This will tell you the location of your USB drive, in the case below it is located at /dev/sdd so I'll use that for the rest of the tutorial. Please remember to substitute in the actual location of the drive when you are doing this.
kevie@kev-pc:~$ fdisk -l

Disk /dev/sdd: 4009 MB, 4009754624 bytes
124 heads, 62 sectors/track, 1018 cylinders
Units = cylinders of 7688 * 512 = 3936256 bytes
Sector size (logical/physical): 512 bytes / 512 bytes
I/O size (minimum/optimal): 512 bytes / 512 bytes
Disk identifier: 0x00000000

Device Boot Start End Blocks Id System
3. unmount the drive with the command: umount /dev/sdd

4. I'm going to assume that your wanting the pen drive formatted to FAT32 to allow you to use it on any system. Type: mkdosfs -F 32 -I /dev/sdd

That's it, your done.

Wednesday, 29 December 2010

Adding user to Sudoers file

I remember my first time exploring Linux distros outside the safety of Ubuntu. One of the very first things that confused me was when I tried to use the sudo command I was greeted with the message:
kevie is not in the sudoers file. This incident will be reported.
In the community we are often guilty of assuming things we do regularly are known to all users, but we all lacked knowledgable at one time. Well the first thing that is important is how to add the user to the sudoers file.

1. open the terminal

2. type su (then enter your password)

3. type visudo

this will then bring up a screen full of characters, you can scroll around, but you'll notice that we can't start typing right away, we are in the editor called vi

4. scroll down to the line root ALL=(ALL) ALL

5. press i to start editing the file

6. below the line in step 4 enter {your user name} ALL=(ALL) ALL

7. stop editing by pressing the escape(esc) key

8. assuming everything went alright* enter :wq to save and exit the file

*if you accidentally changed something you shouldn't have :q! will exit without saving the file. If you need to do this type the command and go back to step 3.

You are now in the sudoers file and can use sudo to gain superuser privileges. But remember:
With great power comes great responsibility
The second question you'll be asking yourself is "Who does the first 'illegal' use of sudo get reported to?" Well the following illustration should help: