Friday, 2 December 2011

HIV or Unemployment?


This is a million miles away from what I would normally talk about on my blog, however after Dimitris Papageorgiou (@lopbox on identi.ca) brought this to my attention I felt unable not to talk about it.

The story in question has received hardly any media coverage in Greece and next to none in other countries, yet this will probably shock the majority of readers. The news story that was brought to my attention is available here and here (translated from Greek).

It concerns me that people feel that they need to infect themselves with the HIV virus rather than risk going into an uncertain future. Granted I do not live in Greece and am not aware of exactly the situations of these people however I can't help but feel that this is an incredibly short sighted (and worrying) view of life. Are these user aware of the dangers HIV exposes them to or are they simply feeling betrayed by their country and honestly feel that there is no alternative.

The articles state that the users are infecting themselves, at huge risk to their health and (I assume) life expectancy for the sake of 700 Euros a month. To put that into some other figures: 964 US dollars, 617 British pounds. Whilst I can't speak for the US, I know that working full time on minimum wage will net more than £617 in Britain at the end of each month.

The recession and the financial climate in Greece has been in the media focus for some time now, however these stories are not filtering through to the rest of the world. I can't help but think that a citizen of a member country of the European Union should have more security in the present time and hope for the future.

Whilst nobody wants to be the focus of charity work, even this would be better than infecting oneself with HIV in order to get by. However here in Britain, I have not seen any charity work for nearby countries like Greece. We (the British public) seem very keen on shipping goods and aid to far off countries. I am not condemning this, it is a worthwhile venture. However we also need to focus on those who are struggling in our own country and our neighbours in Europe. I am also aware that we are in difficult financial times, however, is our situation really that bad that we would infect ourselves with a deadly virus for an extra £617/$964/700 a month?


For more information on the HIV virus visit the relevant NHS pages

Saturday, 26 November 2011

Problems with Nvidia on update to kernel 3.1.0-1

I recently came into some problems which gave me a great deal of hassle whilst updating to Linux Kernel 3.1.0-1, I have a 64 Bit System and source my software from the Debian Testing repositories.

On what should have been a fairly routine update, I restarted my system later in the day to find myself dropped into a command line with a message stating that X server had failed. Running the command nvidia-xconfig would produce a new xorg.conf file, but I would still receive the same error message about the nvidia module being unknown.

I spent a few hours trawling the forums on the net and they all pointed to a rebuild of dkms, however putting in the command sudo dpkg-reconfigure nvidia-kernel-dkms, left me with the error message
Module build for the currently running kernel was skipped since the kernel source for this kernel does not seem to be installed.
This left me scratching my head and very frustrated as I knew that the kernel source was installed. Finally I started looking at the installed components and noticed that the kernel headers did not match the kernel source number, my kernel source was 3.1.0-1, whilst the installed headers were linux-headers-3.0.0-1-common and linux-headers-3.0.0-1-amd64, a miss match.

  1. I simply ran the command: sudo apt-get install linux-headers-3.1.0-1-common linux-headers-3.1.0-1-amd64
  2. then I followed it with: sudo dpkg-reconfigure nvidia-kernel-dkms
and viola, upon restart I was back in my graphical environment. This, of course, will not solve every bodies problems, however this is the simple fix that worked for me, but it took me a long time to find it. Hopefully this will spare some people a few hours of pain and frustration.

Friday, 30 September 2011

Putting Browsers to the test with Acid3 and Peacekeeper

During episode 5 of TuxJam I reviewed a browser called SRWare Iron. This is a fork of the Chromium browser (an open-source community version of Google Chrome) with a few tweaks under the hood.

I put three different browsers to the test using two online tools: Acid3 and Peacekeeper. The three browsers in question were:
  1. SRWare Iron
  2. Firefox 9.0a1
  3. Seamonkey 2.3.3
From the Acid3 test, all the browsers performed very well:

SRWare Iron


Firefox


Seamonkey


However, it is during the second test using the Peacekeeper resource that SRWare Iron really separated itself from the other two. A brief look at the overall points:

Then we can break these down into more detailed reports of how the browsers final score was achieved.


From these findings on the Peacekeeper website, it appears that SRWare Iron performs doubly well compared to Firefox and Seamonkey. Whilst I did find it was a fast browser, I didn't notice that much difference between the three. However all of these browsers noticeably outperform Internet Explorer which I have to use day to day in my place of work. I do not wish to install it and run it using WINE to perform a fair test.

Saturday, 24 September 2011

Using WeeChat with Freenode (the basics)


I recently tested out WeeChat which is a very fast and lightweight IRC client that is used in the command line.

I must say that I was extremely impressed with the program, but not with the documentation. The quick start wasn't of much help and the user guide was way too heavy and detailed, going into things that were far beyond what I was needing for internet chat.

I'm assuming that the user has already installed the program, if not check the repos or visit http://www.weechat.org for installation details.

Start the program:
weechat-curses
Set your username (dont forget to include the quotation marks"):
/set irc.server.freenode.username "{enter your username here}"


Set your real name (optional):
/set irc.server.freenode.realname "{enter your name here}"


Connect to Freenode:
/connect freenode


However if you would like to connect to Freenode by default every time you start up WeeChat:
/set irc.server.freenode.autoconect on


If you've registered your username (highly recommended so that nobody can pretend to be you) then you will need to prove you own the username by supplying the password:
/msg nickserv identify {your password}


Identify your username automatically every time you log on:
/set irc.server.freenode.command "/msg nickserv identify {your password}"


Join a channel (don't forget the hash # tag):
/join #{channel name}


Automatically join a channel (or channels) every time you log onto freenode:
/set irc.server.freenode.autojoin "#{channel 1},#{channel 2}"


These channels will open up side by side, one does not replace the other. However as this is a command line tool there are no tabs to click on for different chats. The next few commands give some examples of navigation, they all produce the same outcome using slightly different techniques, try these and decide on the ones you are happiest with.

Move to the next channel:
/buffer +1


Move to the previous channel:
/buffer -1


If you remember the channel name:
/buffer #{channel name}


All of the channels you join are assigned a number (the channels start at 3, 1 is the Freenode front page) To jump straight to the channel:
/buffer {channel number}


All of the above /buffer commands all essentially allow the user to navigate through the active chatroom channels, decide which one works best for you.

Should a user send you a private message, you are able to navigate using the above commands, it behaves just like another channel. When a user sends a message, their username will appear at the bottom of the screen, above the text entry box.

Any messages that mention your username during the chat, their username will change to a yellow text with a purple background. This makes it easier to keep track of a conversation in a busy chatroom.

Send a user a private message:
/msg {username} {your message goes here}
A condensed version of this post is available for download in odt format here, this is ideal if you wish to print these off and can also be easily edited.

This isn't even close to all of the commands and tools available to the end user, however it should be enough to allow the user to perform most of the basic required functions for an internet chat on the Freenode network.

If there are any tasks or command that you feel this guide is missing then please leave a comment below.

Wednesday, 21 September 2011

Yibo - Android micro-blogging client

I came across this micro blogging tool purely by accident and thought I’d give it a try. This supports a variety of social networks, however at first appearance identi.ca and status.net do not appear to be an option. But on closer inspection it does allow the user to edit the API so to use Yibo with your identi.ca account simply enter the appropriate username and password and enter identi.ca/api for the API. My original intention was to review this application in an upcoming episode of TuxJam, however I couldn’t find out which license it has been released under so I decided to add it to my blog instead.

The UI is definitely aimed at twitter with the yellow bird and blue theme, however it is actually quite nice. The avatars are clear, if a little on the small side. Your username and avatar are permanently on display at the top of the screen and new posts are made by a (nicely) obvious button in the top right of the screen. The user can set the update frequency, however moving your finger down the screen will perform an instant update.A long press on a dent allows the user to reply, a nice feature of this is that the message your replying to remains on the screen under the message that the user is composing, this ensures that the correct dents are sent to the appropriate user, I’ve personally experienced issues with this before when I dent the wrong person. Other options on a long press include: redent, mark as favourite, view user profile, share to other accounts and copy to clipboard.


At the bottom of the screen, again the icons are obvious, this is a good thing as this has been written for the Japanese market, so personally I would find it impossible to read any documentation on it. The users ‘inbox’ is split into three (only two of which seem relevant to identi.ca): your replies and direct messages. The replies work fine, however there seems to be an issue with direct messages as only the most recent one is shown, even selecting more did not produce any additional direct messages. There is a third option that is entitled comments, however this personally gives me a nil response so I’m assuming that it is a Twitter feature. There is a button to view your profile and dents, a search feature and a few more that I didn’t use, again I think these were more aimed at Twitter users. There is also a well laid out menu page that directs the user to a number of places.


A bug (well I'm assuming this isn't a feature) that I discovered was that the dictionary does not appear to work with this application, whenever you are composing a dent no predicted text or spell checker comes up. I found this a bit of an inconvenience, but as I know a lot of people turn this feature off anyway, then it should not put potential new users off.


Whenever you exit the application, it displays a logo at the top of the screen to inform the user that the Yibo is still running in the background, that’s a handy feature if you want to ensure maximum battery life. Notifications are regular, however, by default, it alerts the user to all the new dents in their timeline, not just your direct mentions. This feature will be quickly switched off by the majority of users.


Overall it’s a nice application with some good features. As far as speed goes it’s quite quick, it doesn't have the lag that some of the Android micro-blogging clients suffer from. It seems very stable, not had any crashes after two weeks of testing. If you can get past the Twitter like colour scheme, then this is a very nice client that is worth checking out.


Thursday, 18 August 2011

Barrage - the life of a defence turret


Are you old enough to remember the days when the Westwood released the game Dune 2 (one of the first real time strategy war games on the market)? Then a few years later the genre went from cult status to instant classic due to the popular Command and Conquer series. We built up our bases and always included several strategically placed defence towers. If you ever wanted to know what life was like as a defence tower in the first Command and Conquer game then Barrage is the game for you.

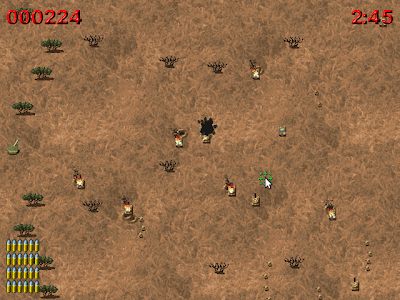
The graphics are taken directly from the original of the C&C series games, with the vehicles, tanks and soldiers all members of the GDI (Global Defence Initiative) along with a familiar dessert landscape. They move around smoothly and are accompanied by some nice sound effects of guns firing and bombs exploding, however I feel that background music would have been a nice addition.

The sprites move vertically up and down the screen, some of the tanks change their pace slightly, but overall they remain mostly at the same speed. The game is contained within a three minute timeframe: kill as many of the enemy as you can within the allotted time. Any of the enemy units that cross the screen safely will result in points being deducted. The game is controlled using the mouse; simply move about the screen to target; left click shoots rockets; right click reloads and middle click fire grenades (useful on soldiers only).


Although the sprites do not move that quickly, the sheer number of them will have the user requiring quick reflexes and a sharp eye along with a wee bit of anticipation depending on the enemy unit being aimed at.

Overall this is fun, but without the ability to move the game soon becomes repetitive. Also there is no way of increasing your allotted time: 3 minutes and that's it. The main reason for returning to the game is to beat your top score. There are no extra missions (as far as I can see) and given this game is dated 2003-2010 then it's probably unlikely they will be added, however I will update the post if this happens.

There are some good ideas in here and the game is fun for a few minutes, however it soon becomes repetitive and the lack of progression hurts this games longevity.

Friday, 8 July 2011

DuckDuckGo Search Engine


In season two of Tuxradar podcast the group challenged themselves to use an alternative search engine to Google for a week. Sadly they all reported back on a terrible week being forced to use Bing, Microsoft's search engine. This got me thinking: have we come to rely on Google so much that we can't even use the internet on a daily basis without it? After a browse around for various search engines I discovered DuckDuckGo.

The front page has been heavily influenced by the classic Google homepage, simply a white background with the name and logo above it. To further enhance this theory that it's influenced by Google's design: the badge is modified regularly to correspond with the relevant date (sounding similar).

One of the first things I noticed was the lack of a search for news, images or videos. Something that we have become accustomed to with the Google search engine. However upon a bit more digging I discovered that DuckDuckGo uses a facility called Bang commands, some of the most popular these can be accessed by clicking on the arrow beside the search box, most need to be entered directly into the search field. The bang commands include:
  • Amazon !a
  • Google images !gi
  • identi.ca !identica
  • IMDB !imdb
  • map !m
  • news !n
  • Open Clipart !oca
  • Wikipedia !w
  • YouTube !yt
For example to search Amazon for a Drupal 7 book you can enter !a drupal 7 into the search box.

However the bang commands listed above don't even make up the tip of the iceberg, a full list of the bang commands can be found here.

DuckDuckGo also has a policy of not storing information, unlike Google, and using it for advertising. Of course DuckDuckGo does include advertising, most search engines can't survive without it, however it keeps no record of your searches. The adverts are purely based on the text you have entered into the search box. OK, you may be thinking "That's a load of paranoia", fair enough but your search bubble isn't; that is real.

From the time you've started using Google a record is kept of what you look up. So if you frequently search for baking competitions, photography and open source software in the UK whenever you type anything into a Google or Bing search it will focus it's search around you, often not giving you the most relevant search results, but what it wants to, these will also change depending on what part of the world your in. For a more depth look at the search bubble take a look at dontbubble.us

The final feature of DuckDuckGo that I really like is the filtering system, it cuts out a lot of pointless sites that just lead to a download of some pointless file you didn't want. But more importantly, especially to me as a father, it filters out adult content by default. Take a look at the example below of the same search, using default settings on Google, Bing and DuckDuckGo:

Google:


Bing:


DuckDuckGo:

Of course you can switch this feature off on DuckDuckGo and I assume turn it on with the other two, but the fact that it is there by default gives me comfort. This makes DuckDuckGo an ideal search engine to be used at work and in schools.

So far I've been using DuckDuckGo for a month. I've been really pleased with the quality of the searches and it has now become my homepage and also my default search on my browsers. I've noticed that some of the Linux distros have started using it as the default search engine. It really does have a mountain to climb in order to convert users using Google and (to a lesser extent) Bing. But this is a worthwhile task in my opinion.

You can test out DuckDuckGo directly from this site: take a look in the top right of the page and you'll find a DuckDuckGo widget, give it a try for yourself.

Don't Google it, Duck it!

Tuesday, 14 June 2011

Recent project and contributing

Although I have not had many graphical projects recently, I did complete a piece of work for Marie Axelsson (@maloki on identi.ca) for her blog site.

I actually enjoyed this task as I was able to communicate with the end user directly through Instant Messaging, this made changes etc to the project a lot easier and feedback was considerably quicker than normal.

The final design that we settled on was:


This can be seen implemented on her blog here

The design was a combination of her interests and likes, the idea was supposed to resemble passing from the real world (with the earth and stars) into the virtual world (emblems and binary digits).

As always the image was created using open source software, both Inkscape and the GIMP were used in the creation of this image.

My reasoning for displaying my projects is not simply to "toot my own trumpet" but to promote open source software and also to show that most of us can contribute to open source. I can't code, I'm useless in that aspect, however I am able to produce graphical items. OK then, maybe graphics isn't your forte either, however you can still take the time to test a project and provide feedback or bug descriptions. Everybody can contribute to open source, regardless of their supposed "lack of computer skills". Even simply installing an application, using it for a week and then sending the creator or team an email sharing your thoughts, it doesn't have to be technical, just describe the problem you've encountered or features you think may be handy. Also explain that your not a coder, communication is the key. So many projects are struggling for contributors, any help offered will be greatly appreciated by the community. The number of Linux desktops and applications is testament to how well a community can work together.

Tuesday, 31 May 2011

Adding a new user and default user groups in Crunchbang

Recently I had a bit of an accident when I stupidly entered the wrong letter letter into a command and ended up removing myself from all the default groups on my profile in Crunchbang Linux. No problem, I thought, I'll just use the same groups that I added my username to when I created my Gentoo system. Problem: Gentoo and Crunchbang (Debian based) use different groups. This was a more annoying problem than I expected.

This resulted in a lot of wasted time so I thought I would share the experience so that it could be easily fixed without wasting the amount of time I did in looking for a solution.

To add a user we simply open up a terminal and type (as root) the command adduser

This will ask for some details of the new user including name, username and password. This will give a new user a working login and a home folder, however it will not give the new user any group privileges. The default groups that Crunchbang assigns to a user upon installation are:
  • cdrom floppy sudo audio dip video plugdev netdev bluetooth powerdev
To add the user to these groups we enter the command (as root):
usermod -a -G cdrom,floppy,sudo,audio,dip,video,plugdev,netdev,bluetooth,powerdev {the new username}
Please note that the above command may appear to be on different lines, but it should be written all on one line with a space after "-G" and after "powerdev", all the groups are separated with commas. Once you have done this then your new user is ready. Don't forget to add the new user to the sudoers file, if your not sure about this then take a look at this post for some extra help. If your like me and you end up removing the user from the groups then simply add your current username to the above command.

Sunday, 29 May 2011

Simply Mepis 11: simple enough?

Mepis was one of the distros that I had not tried until very recently. It was often described as the distro for newbies before Ubuntu was around. With Ubuntu's move to Unity and a lot of other distros embracing Gnome 3, more and more users are looking to other, more traditional desktop environments, such as XFCE and KDE.

Mepis uses KDE as it's choice of desktop environment and is intended to work 'out of the box', which is not the norm for a KDE distro. Upon loading my graphics card, Nvidia GeForce 6200 AGP, worked without any tweaking; an impressive feat by any distros' standards. I was able to get the extra effects working straight away. This was the experience with all of my hardware; inlcuding my microphone and webcam. The black and blue theme of the distro looks nice and modern, very appealing to the newbie switching from Windows for the first time.


Some of the stickier points of a Linux distro for a newbie have been addressed, flash and Java come pre-installed, DVDs and MP3 files play without any need for tweaking. There is a good range of software including VLC and Amarok (media players), Libre Office suite, Dolphin, Kopete (instant messaging client), Inkscape and the GIMP. Some exclusions are noticeable, no software has been pre-installed for micro-blogging or torrents. In my opinion these are some essential user tools that most users expect to be present. With such option as Choqok and Ktorrent available it does baffle me as to the exclusion of these applications.

This brings me onto another point in need of development: installing software. Mepis is aimed at newbies, but only includes Synaptic as a graphical package manager. This is the one significant thing this distro lacks: an equivalent of the Software Centre that Canonical provides in it's Ubuntu distro. Synaptic is not a tool for a newbie user, whilst I personally use the command line tool aptitude (which I had to download using the command sudo apt-get install aptitude) this is not ideal for the new user.

Firefox 4 is the pre-installed browser of choice in Mepis 11. The odd thing about this is that by default the page opens up to a blank screen (shown below). Most users like to see something when they load a browser, even if it's just to show that their internet connection is working. I would like to see the startup page being linked to Mepis or a search engine, but a blank page, in my opinion, isn't the best option.

However these issues aside, Mepis is a very solid ditro, with a lot of features that work out of the box, this makes it very difficult to pass up as a good newbie distro. No tinkering to get the basics done, youtube etc will work without any tinkering. This approach may not win the support of the puritan freedom lovers, but this isn't the target audience of Mepis. However the lack of a software centre really does hurt the newbie appeal of this distro. Highly recommended, but make sure there is a Linux user nearby to help setup the system.


Friday, 13 May 2011

Pogo music player


Having recently volunteered to do a bit of graphics work for a project called Pogo, I thought I should investigate this application a bit more and even give it a trial run. I have to confess, at the time the email came in requesting help with a logo I accepted the challenge without even knowing what the application did.

After briefly reading through the email and several brief conversations between the creator Jendrik Seipp and myself, I took a look at the website, which to my disappointment was simply a launchpad page. So the first thing that struck my mind was that this was, primarily, an Ubuntu project. The choices for download are a *.deb file or the source data in a *.tar.gz file. As I have Crunchbang installed on my system anyway I opted for the deb file simply to make life easier.


The install went smoothly and very quickly I had the Pogo music player (0.4 at the time of writing this) up and running:


The user interface is very simple; a window split into two screens. The left screen is a tree view of your files, this can be navigated quite easily for any music that is in your home folder. However for files that are on a separate partition, you will need to go all the way back to / and manually find the mount point of the drive (usually /mnt or /media depending on your distro). The partition must be mounted already as there is no way to mount it from Pogo.

The right screen is your playlist, to add a music file you can either double click on it in the left screen or drag it into the right screen using the mouse and holding the left button. The responsiveness of Pogo is very good indeed, it is lightning fast and the files play without any delay. Whilst playing, a progress bar appears at the top, which can be dragged to get the position in the file you want, handy for longer podcasts. Also the cover of the album appears in the bottom right of the window.

True to Ubuntu style, whenever a new track starts a notification pops up in the top right of your desktop just under the system tray (again this is depending on your desktop environment, but this is the case in XFCE). These, thankfully, can be turned off with a single click in preferences.


A search function is also included to allow you to look out your favourite bands or songs quickly, however all it kept giving me was a "no tracks found" message. Take a look at the screenshot below, look at the search, now compare the result with the tracks that are currently playing:


There are a few major omissions that I simply couldn't live without with regards to my media player:
  1. The lack of a shuffle option (this apparently is set to be included in the next release)
  2. The ability to add all the files from a folder, instead of selecting the files and moving them over to the playlist screen.
  3. The ability to stream from the internet
This isn't aiming to be VLC. It is a fast and simple music player and, if I'm being honest, it plays files and uses up hardly any resources in the process. The notifications that can't be interacted with are very much in line with the current Ubuntu trend. I feel that this project is best suited to low spec machines and (very early stage) newbie users, those like your older relations who only want to play a few files. Pogo adopts a 'keep it simple' philosophy, the lack of options and buttons make it incredibly easy to use. I'll keep an eye on this project, but I won't be uninstalling VLC quite yet. A bit too basic for my needs at the present time.

Flattr - Twitter logo

Continuing on with my recent Flattr work, I was asked to do a logo that incorporated a combination of the Flattr micro payments site and the ever popular micro-blogging site that is Twitter. Three mock ups were made for this:

Flattr and Fail Whale:


Flattr and Twitter bird:


However, in the above version it was felt that it could cause offence as the bird appeared trapped. It was opted for a friendlier type of enticement where the bird was being tempted or lured towards Flattr, after some work, this was chosen for the final design:


You can Flattr any (or all three if you like) of these pictures by clicking on them, every donation is always appreciated.

Please note that you will not find me on Twitter, if you wish to follow my posts then sign up to identi.ca I'm registered there as @kevie

Supporting open source. All of the above graphics were made exclusively using Inkscape.

Monday, 9 May 2011

Saving BBC iplayer programmes


The BBC iplayer offers viewers a chance to catch up on programmes that have recently been shown on the channels. However this is for a strictly limited period and many of the programmes shown will not be released on DVD. A lot of us still don't have DVD recorders, most of us have disconnected the video recorders, although Sky+ does allow us to store programmes, they can only be stored to the local box and not to portable devices or even other TVs in the house.

However there is an easy way to download the programmes, we only need two applications installed on our home PC:
  1. get_iplayer
  2. flvstreamer
Both of these are available in the Debian/Ubuntu repositories, you can get these by opening up the terminal and entering the command:
sudo apt-get install get-iplayer flvstreamer
Users of Fedora or other distros based on Red Hat will need to make sure that the rpm fusion repository is enabled. Once this has been done then it is simply a matter of opening the terminal and entering:
sudo yum install get_iplayer
The application is now installed on your machine however it is a command line tool and therefore will not show up on your applications menu.

Using get_iplayer

1. To use it go to the BBC iplayer website and select the programme of your choice:


2. Copy the web address of the programme from the address bar.


3. Open up a terminal

4. type: get_iplayer --pid={the web address of your chosen programme} if you want the video in HD then add the command --vmode=flashhigh after the web address


get_iplayer will start to convert the film and it will be saved as an MP4 file.


The file is now saved on your computer, the best part is that it is now DRM free, you can watch it on your media player, phone (you may need to perform a bit of converting/editing) or any other PC in the house. If you want to watch it on your home TV through your DVD player then that is also possible (I personally recommend DeVeDe for that task). Enjoy your videos.


Friday, 15 April 2011

Humble Bundles

Over the past year there has been a collection of games released under the name "humble ...... bundle". they have been released in the donation format, you can pay what you want in order to receive a pack of 4-6 games. The first pack included:
  • World of Goo
  • Aquira
  • Gish
  • Lugura
  • Penumbra (overture)
The second pack included the following:
  • Braid
  • Machinarium
  • Cortex Command
  • Revenge of the Titans
The current collection called the Humble Frostebyte Bundle includes:
  • Trine
  • Shadowgrounds
  • Shadowgrounds: survivor
  • Jack Claw
  • Splot
The continuing arguement is that Linux users will not pay for anything. Well lets look at the facts: over the last three bundles: the average Windows user has donated $6 whilst the average Linux user has donated over $11, almost twice as much. The fact that the average Linux users pay double shows that there is a market out there for Linux gamers. Hopefully this will get some of the established companies taking note that games are important to Linux users. The sad fact is that we are treated as second class. We need native Linux games to be a success in order to promote growth. With the recent expansion of independent gaming companies, this is becoming more of a realistic challenge daily. OK we may never have even close to the number of windoze and xbox gamers on Linux, however the fact that companies are taking note of the needs of Linux gamers is a step in the right direction.

Friday, 8 April 2011

Flattr: a brief introduction


For those of you that have been following my blog for a while you may have noticed that recently each post now concludes with a Flattr button. Following my recent Wikileaks and Flattr design followed by a few discussions with other users on identi.ca, I suddenly became aware that Flattr isn't perhaps as well known as I first thought. Several users asked how the system worked, given that this is very difficult to do in 140 characters or less, I decided to write a blog post about it.

Flattr is a Swedish based micro payments system, which allows users to donate funds to a project or cause of their choice. But is this simply PayPal with another badge and colour scheme? NO. Flattr is done in a way that is probably new to most of us.

Once you've signed up you are required to set your monthly amount; this is what you will pay into your account each month. This is done via MoneyBookers or PayPal and can range from Two Euro to one hundred Euro and is refered to as 'Means'. Now you've got the funds into the account you can start donating (flattring).

To donate simply click on the green Flattr button; these can be in three types:


Every time you click then each donation will become less. Your monthly amount (means) is divided by the number of clicks within each month. For example if your means is set to ten Euro and throughout your first month you click on five Flattr buttons, at the end of the month each thing you've flattred will receive two Euro. However, if in the next month you start to Flattr a few more things that you like, say you've clicked on twenty items: in your second month each thing that you Flattr will only receive 50 cents.

The best way that I've found to describe Flattr to a newcomer is to think of the month as a child's party, the flattred projects as the children and your means as the cake. The cake doesn't get cut and dished out until everybody has arrived (the month's over), once all the children have arrived then all receive a slice of cake. The more children in attendance, then the smaller each slice will be.

If you do not Flattr anything in a particular month, maybe your on an extended holiday or some circumstances arise where Flattr is low on your list of priorities, then Flattr donates your means to a charity of it's choice. A more detailed explanation of the process and the charities involved can be found here.

However this is not the only way to donate using Flattr, there is a one off payment option, similar to the PayPal or bank transfer style. This will allow you to donate up to fifty Euro to the cause or project of your choice.

But we are still not done; what if your work is outside in the real world and not in the virtual world? No problem, Flattr has that area covered too. The user is given the option to print out a QR Code which can then be scanned using a smartphone, this scan has the same effect as clicking on the green Flattr buttons.


This feature is the one thing that gives Flattr huge potential. In today's world, people are increasingly carrying less hard cash and paying by electronic means. This could prove to be a potential problem with people who rely on tips and donations as a major part of their income. However Flattr fills this role nicely, as this busker is proving:


Think of the range, potentially limitless. Going along to an art gallery or museum, seeing something you like and click, you've flattred the creator directly. Scanning a name-badge of a person that served you in a cafe or bar, porters, taxi drivers, the list is potentially endless.

So why is it not in our day to day lives yet? Well people and companies have to adopt it: it's all very well saying you want to Flattr 'Children in Need', however if they do not have a Flattr account then this is not an option. More users have to embrace the technology if Flattr is going to grow to it's potential. Growth will come with demand, if you like it tell your friends and work colleagues, spread the word about Flattr.

Tuesday, 5 April 2011

Teefury: 24 hours only

We often see the signs in various shops, magazines, TV advertisements etc that sales and prices are 'one day only' in a bid to get you to rush out the product. Most of the time if you check back in another month the 'once in a lifetime' offer is repeated. However once in a while you may be told that something is one day only and TeeFury is one such company that delivers on that promise.

TeeFury offers t-shirts for 24 hours only; once the time has gone, the t-shirt is removed from the site. I hear you ask "What makes this site even worth a mention? there must be thousands of t-shirt sellers online." Well the t-shirts for sale are not ones that are usually bought off the rails at the local clothing retailer; rather they have been designed and submitted by the users of the site. All that you need to do is sign up for a free account and you can submit as many designs as you like. The submission process really is simple:

If your more into manual graphics then they will also accommodate you: create your picture, scan it and send in the scanned image. For every t-shirt sold the creator gets $1.

The t-shirts themselves are priced at $10 plus postage and packaging. Now before you switch off here when I start mentioning US dollars: they do post worldwide. The total cost for a buyer in the UK is $19, for a rare t-shirt that isn't too bad a price.

The t-shirt designs change every 24 hours, as mentioned earlier in the post, so if you don't like today's simply check the site again tomorrow for the new design. Most of the time the designs incorporate two themes, but this is not always the case.

Being a child of the 80s I opted for a Back to the Future themed shirt for my first purchase:

The parcel arrived two and a half weeks after ordering it; not rapid, but I've had longer waiting periods for international packages. The quality of the shirts themselves is good, a nice cotton t-shirt; fairly thick but not heavy. However the one thing that caught my attention was the quality of the print: it really was very good. After two weeks and several washes the print is still as good and colourful as when it arrived. From past experience I have found that custom printed shirts fade very quickly after a few washes, but so far this has exceeded my expectations.

The site has a gallery section showing the t-shirts that were previously available. Whilst it is interesting to look back, this is a feature I wish that the site didn't have. It clearly states that once the 24 hours are passed they are not available: why tease the customer by showing us some really cool designs that we have no chance of getting. I looked back and saw this shirt, as mentioned before, I'm an 80s child: Guns n Roses and He Man were two of my favourite things from my childhood, why oh why did I have to miss this one? I still cry myself to sleep and have dreams about chasing the t-shirt but it's always just out of reach. Well no, I'm really not that sad. But I am gutted that I missed that one; now do you see my side of the argument as to why the gallery is not necessarily a good idea?

To be honest, I thought for $10 plus postage that these would be cheap, low quality t-shirts that you may wear a few times and then keep for sentimental purposes. I've been very surprised at the good quality of both the t-shirt and the print. If you see a design you like I would have no hesitation in recommending purchasing from TeeFury.

Flattr-Wikileaks logo

A while back I was asked by Marie Axelsson (@maloki on identi.ca) to come up with a logo for a blog post that combined two things she was going to write about: Flattr and Wikileaks. This was mainly in response to the knee jerk reaction from Paypal and the major credit card companies Visa and Mastercard along with a bank in Switzerland that froze Julian Assange's funds. Flattr has continued to allow support for Wikileaks, you can view the profile here.

But the challenge was to create a logo that would incorporate the two companies. After a good few hours developing roughs and then tweaking the idea, the final logo is shown below:

The image has been created using Inkscape and is made entirely from scratch. Although both logos are widely available on the internet, the beauty of creating it from scratch as an svg (scale vector graphics) file is that it can be blown up to the size of huge banners without any distortion or pixelation. For viewing purposes the files on display in this post and flattrchattr's are png files, these will distort when stretched.

The article in question is located on flattrchattr.com, you can view it directly here

If you like the logo then you can make a flattr donation by either clicking on the flattr button at the bottom of this post or by clicking on the image itself within the flattrchattr post.

Thursday, 17 March 2011

Crunchbang Statler R20110207 Review

Following my trial and review of Crunchbang Linux Statler Alpha 1 quite some time ago I recently decided to give the latest release R20110207 a try. Again, having little to no experience with openbox, I opted for the XFCE 64 bit version of the distro, all the versions are available here http://crunchbanglinux.org/downloads/statler/20110207/ . For those of you that may have tried Crunchbang in the past, the one main change within the distro is that it is now Debian based instead of Ubuntu based. People have different opinions on this, but for the majority of users the main thing you will notice is the software available in the repos is different, especially if your only previous experience is the Ubuntu software centre. But then again, if your a relative newbie then I'm not convinced that this is the correct for you. For the new users venturing out of Ubuntu for the first time then I would probably recommend gaining experience with Linux Mint, Simply Mepis, Mandriva or Pardus. A potentially unstable system is great for learning and experience, but not so convenient for inexperienced users as an everyday system.


The first thing that you notice about Crunchbang is the speed: it's fast. This distro is one of the quickest implementations of the XFCE desktop I have come across. The desktop, by default now comes with a taskbar along the bottom, the workspace switcher is implemented in a much neater fashion, in the traditional way beside the newly added system tray. The Conky widget displays system information and some useful keyboard short-cuts is positioned in the upper right area of the screen. Whilst this may be useful to some users, I really would like there to be a quick way of disabling it.

The menu can be accessed via a right click on any part of the desktop, a new feature is a quicklaunch toolbar on the left hand side of the screen. This is hidden by default but appears when the user moves the mouse over to the left edge of the sceen. This can be easily modified to suit the users taste.

For such a nimble distro Crunchbang comes with a large variety of pre installed programs:
GIMP (photo editing)
Viewnoir (image viewer)
Hey Buddy (microblogging client)
xchat IRC (Chat client)
Chromium (web browser)
Abiword (word processor)
Gnumeric (spreadsheets)
VLC (media player)
Thunar (file manager)
Synaptic (software centre)

Whilst everybody has their own personal preference, this distro comes with a minimalist approach, but is highly usable out of the box.

Despite the inclusion of the Synaptic Software Centre, I've found that I have installed all my apps from the command line, Crunchbang opts for apt-get, I personally prefer aptitude, but this can be easily installed from either a Synaptic or using apt-get.

The overall system feels a lot more polished this time around. Philip Newborough (@corenominal on identi.ca) has done a really good job of tweaking this distro and having it run very smoothly. I've been using it for a month now and have not run into too many problems.

The biggest concern for the average user is the lack of pulseaudio. Most people may think 'who cares' but pulseaudio is needed to run Skype. I have had some problems trying to setup Skype on Crunchbang, but if I'm being truthful I haven't spent much time on it.

Being Debian based, there is a huge commitment to pushing free software. Getting MP3 and other non free media types to work isn't simply a matter of clicking 'ubuntu restricted extras' from the software centre. For those who are having problems with this I recently produced a guide here. But at the end of the day Crunchbang isn't design for the newbie. It will require a bit of knowledge to get everything setup to the way the end user likes.

It's a great starting point if you want to build your own Debian based distro, or is especially good at running older hardware. An improvement under the hood and smoother running has lead this to become my joint day to day distro, probably one of the main reasons I haven't fixed some of the pulseaudio issues is that I've already setup Skype on my Gentoo distro. If you haven't tried Crunchbang before or if it's been a while, then I recommend that you give this superfast, Debian based distro a go. It won't be to everybody's taste, but if your interested in creating your own distro and don't feel ready for Arch or Gentoo yet, then this may be a very good starting point.

Sunday, 27 February 2011

MP3 files in Debian

A lot of new users move from Ubuntu to another Debian based distro to limit the ammount of change they experience. But often can be a bit daunted by the challenges that Ubuntu made easy for them. One such is music files in MP3 format.

Whilst I personally use Ogg Vorbis and would encourage all others to, I am realistic that a lot of people still want to use their MP3 files and even build up their collection.

*If you are unsure what the term "as root" means then simply add sudo before each command that requires root privileges, you will be required to enter your password as sudo is a powerful tool*

Playing MP3 files

For playing MP3 files, the quickest method is to download VLC player. This is available from the software repositories from the majority of distros. This can be installed very easily:

1. Open the terminal

2. As root type: apt-get install vlc

This now gives you a player.

Ripping CDs to MP3 format

Should you want to rip your CDs to MP3 format then we still have another few steps to take.

1. Open the terminal

2. As root type: apt-get install sound-juicer

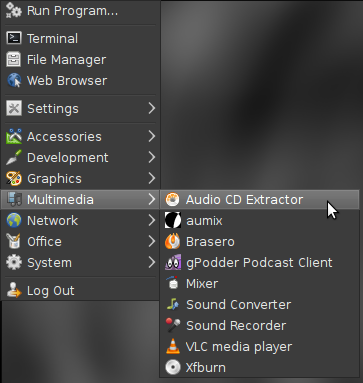
This gives a program that will rip the music from a CD and save it onto the computer. We can load it up from the main menu (usually listed under the multimedia or sound and video), called Audio CD Extractor.


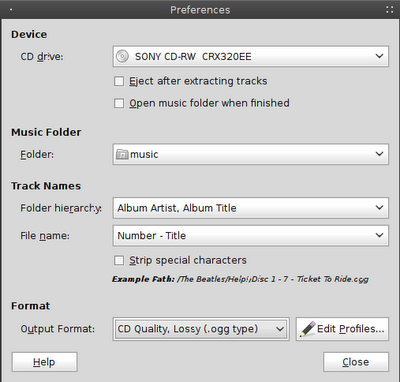
If we open this up and click on edit and preferences we should be greeted by a window as shown below:


Down near the bottom of the window we should see Output Format, this by default is set to CD Qua;ity, Lossy (.ogg type). At this point if we click on this it will not give us the option of MP3. We still have a few more things to do.

The package we need is not available in the Debian repos due to Debian's commitment to free software. But we can add this. We need to go back to our terminal.

3. As root type: nano /etc/apt/sources.list (if you are met with the message unknown command nano, then you can retype the command replacing nano with gedit)

4. Decide what repos you would like to add:

Stable: deb ftp://ftp.debian-multimedia.org stable main non-free
Testing: deb ftp://ftp.debian-multimedia.org testing main non-free
Unstable: deb ftp://ftp.debian-multimedia.org sid main non-free

Add only one of the above choices, just type the part in bold to the end of document.

5. Exit the file by pressing Ctrl + X, it will then ask you if you wish to save press y and then hit return twice.

This will add the repos to our system, but we also need to have the keyring before the repos will work.

6. Download the Debian Multimedia keyring from here.

7. Navigate to the directory and, as root, type: dpkg -i debian-multimedia-keyring*.deb

8. as root, type: apt-get update

9. as root, type: apt-get install gstreamer0.10-lame gstreamer0.10-plugins-ugly

That's it.

To check it has worked open up Audio CD Extractor again, click on edit and preferences. This time when we click on Output Format, MP3 should be an option.

Enjoy your music.

Saturday, 26 February 2011

Formatting a USB pen drive with the Command Line

The vast majority of users today are probably wandering why I would even consider writing a 'how to' for formatting anything from the command line. The vast majority of distros come with gparted installed and that is an easier option to format any drive with the added convenience of a nice graphical front end.

However for those users who like to test out new distros on a regular basis, a USB pen drive is now the preferred option to boot into a live environment. Why? Well for starters programs like Unetbootin make it very easy to put a live distro onto a pen drive. This can be run, booted straight from the stick, without ever having the need to burn a CD. After testing and/or installing the distro the drive can be reused, unlike the CD which may be used as a coaster before ending up in the bin.

Some programs, when they put the distro onto the pen drive, trick the computer into thinking that the pen drive is a CD. It works fine for testing the distro, but when it comes to wiping it you are unable to do it from the file manager (CDs are read only) and gparted will not format it (it does drives not CDs). So your left with a pen drive that behaves like it can't be altered, but this is where the command line is a useful tool.

This will wipe all the data off the pen stick, for safety reasons I would strongly advise disconnecting any other external USB hard drives or pen sticks at this point.

First of all you need to find out the stick is listed as
1. open up the terminal

2. type: fdisk -l

This will tell you the location of your USB drive, in the case below it is located at /dev/sdd so I'll use that for the rest of the tutorial. Please remember to substitute in the actual location of the drive when you are doing this.
kevie@kev-pc:~$ fdisk -l

Disk /dev/sdd: 4009 MB, 4009754624 bytes
124 heads, 62 sectors/track, 1018 cylinders
Units = cylinders of 7688 * 512 = 3936256 bytes
Sector size (logical/physical): 512 bytes / 512 bytes
I/O size (minimum/optimal): 512 bytes / 512 bytes
Disk identifier: 0x00000000

Device Boot Start End Blocks Id System
3. unmount the drive with the command: umount /dev/sdd

4. I'm going to assume that your wanting the pen drive formatted to FAT32 to allow you to use it on any system. Type: mkdosfs -F 32 -I /dev/sdd

That's it, your done.

Saturday, 19 February 2011

NoS-LUG Shirts Update

A while back I spoke about the North of Scotland Linux User Group printing a t-shirt with a view to wearing it at an upcoming open source event such as Oggcamp. Well after a lengthy wait the t-shirts are now available online at Zazzle.co.uk in the UK or Zazzle.com for international orders. Two t-shirts have been created, although these can be customised to any colour the buyer wishes, the default colouring is light blue and navy blue (shown below). A NoS-LUG coffee mug is also available. These items can be viewed here at the store, hopefully there shall be more items to follow.


Please leave any feedback of the items in the comment boxes below.

Friday, 21 January 2011

Blocking an email address in Gmail

I, like almost everybody else I know, use GMail as a primary or secondary email account. But there is one design feature that I don't like: it's not obvious how to block email from a specific user. Yes Gmail has a fantastic spam filter, but your always going to get that annoying person that is going to send 15 jokes, virus warning, government conspiracies and anything else they receive themselves.


To block a specific email address in Gmail isn't difficult, but it's not very obvious to the casual user. This really could have been a lot simpler, Gmail could easily have added a 'block sender' button, but have chosen not to.


Step 1: Open your Gmail account, at the top of the page, beside the search bar, select the option Create a filter


Step 2: In the From box enter the email address you wish to block. Then select Next Step.


Step 3: Place a tick in the box beside Delete It and then select Create Filter.


That's it, you will not receive any more emails from the blocked address.