A lot of new users move from Ubuntu to another Debian based distro to limit the ammount of change they experience. But often can be a bit daunted by the challenges that Ubuntu made easy for them. One such is music files in MP3 format.
Whilst I personally use Ogg Vorbis and would encourage all others to, I am realistic that a lot of people still want to use their MP3 files and even build up their collection.
*If you are unsure what the term "as root" means then simply add sudo before each command that requires root privileges, you will be required to enter your password as sudo is a powerful tool*
Playing MP3 files
For playing MP3 files, the quickest method is to download VLC player. This is available from the software repositories from the majority of distros. This can be installed very easily:
1. Open the terminal
2. As root type:
apt-get install vlcThis now gives you a player.
Ripping CDs to MP3 format
Should you want to rip your CDs to MP3 format then we still have another few steps to take.
1. Open the terminal
2. As root type:
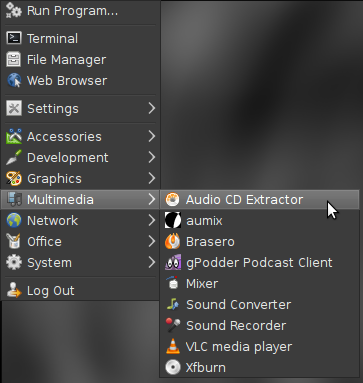
apt-get install sound-juicerThis gives a program that will rip the music from a CD and save it onto the computer. We can load it up from the main menu (usually listed under the multimedia or sound and video), called Audio CD Extractor.
If we open this up and click on edit and preferences we should be greeted by a window as shown below:
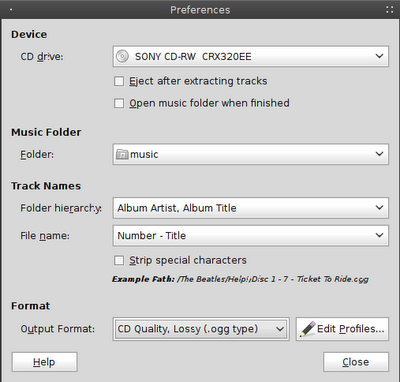
Down near the bottom of the window we should see Output Format, this by default is set to CD Qua;ity, Lossy (.ogg type). At this point if we click on this it will not give us the option of MP3. We still have a few more things to do.
The package we need is not available in the Debian repos due to Debian's commitment to free software. But we can add this. We need to go back to our terminal.
3. As root type:
nano /etc/apt/sources.list (if you are met with the message unknown command nano, then you can retype the command replacing
nano with
gedit)
4. Decide what repos you would like to add:
Stable:
deb ftp://ftp.debian-multimedia.org stable main non-freeTesting:
deb ftp://ftp.debian-multimedia.org testing main non-freeUnstable:
deb ftp://ftp.debian-multimedia.org sid main non-free
Add
only one of the above choices, just
type the part in bold to the end of document.
5. Exit the file by pressing
Ctrl + X, it will then ask you if you wish to save press
y and then hit return twice.
This will add the repos to our system, but we also need to have the keyring before the repos will work.
6. Download the Debian Multimedia keyring from
here.
7. Navigate to the directory and, as root, type:
dpkg -i debian-multimedia-keyring*.deb8. as root, type:
apt-get update9. as root, type:
apt-get install gstreamer0.10-lame gstreamer0.10-plugins-uglyThat's it.
To check it has worked open up Audio CD Extractor again, click on edit and preferences. This time when we click on Output Format, MP3 should be an option.
Enjoy your music.
A lot of new users move from Ubuntu to another Debian based distro to limit the ammount of change they experience. But often can be a bit daunted by the challenges that Ubuntu made easy for them. One such is music files in MP3 format.
Whilst I personally use Ogg Vorbis and would encourage all others to, I am realistic that a lot of people still want to use their MP3 files and even build up their collection.
*If you are unsure what the term "as root" means then simply add sudo before each command that requires root privileges, you will be required to enter your password as sudo is a powerful tool*
Playing MP3 files
For playing MP3 files, the quickest method is to download VLC player. This is available from the software repositories from the majority of distros. This can be installed very easily:
1. Open the terminal
2. As root type:
apt-get install vlcThis now gives you a player.
Ripping CDs to MP3 format
Should you want to rip your CDs to MP3 format then we still have another few steps to take.
1. Open the terminal
2. As root type:
apt-get install sound-juicerThis gives a program that will rip the music from a CD and save it onto the computer. We can load it up from the main menu (usually listed under the multimedia or sound and video), called Audio CD Extractor.
If we open this up and click on edit and preferences we should be greeted by a window as shown below:
Down near the bottom of the window we should see Output Format, this by default is set to CD Qua;ity, Lossy (.ogg type). At this point if we click on this it will not give us the option of MP3. We still have a few more things to do.
The package we need is not available in the Debian repos due to Debian's commitment to free software. But we can add this. We need to go back to our terminal.
3. As root type:
nano /etc/apt/sources.list (if you are met with the message unknown command nano, then you can retype the command replacing
nano with
gedit)
4. Decide what repos you would like to add:
Stable:
deb ftp://ftp.debian-multimedia.org stable main non-freeTesting:
deb ftp://ftp.debian-multimedia.org testing main non-freeUnstable:
deb ftp://ftp.debian-multimedia.org sid main non-free
Add
only one of the above choices, just
type the part in bold to the end of document.
5. Exit the file by pressing
Ctrl + X, it will then ask you if you wish to save press
y and then hit return twice.
This will add the repos to our system, but we also need to have the keyring before the repos will work.
6. Download the Debian Multimedia keyring from
here.
7. Navigate to the directory and, as root, type:
dpkg -i debian-multimedia-keyring*.deb8. as root, type:
apt-get update9. as root, type:
apt-get install gstreamer0.10-lame gstreamer0.10-plugins-uglyThat's it.
To check it has worked open up Audio CD Extractor again, click on edit and preferences. This time when we click on Output Format, MP3 should be an option.
Enjoy your music.
MP3 files in Debian


