Monday, 13 December 2010

Exporting Diaspora posts to identi.ca

With the recent release of the open source social site Diaspora, a flock of us from identi.ca have gladly accepted invitations. Most Linux users are more than happy to pilot software at an early stage.

On the initial setup, as a lover of open source, I felt let down by the 'open source equivalent of Facebook.' After confirming email addresses and some basic information, the setup wizard asks if you would like to connect to other sites. To my horror the options are 1) Facebook 2) Twitter 3) must be identi.ca, right? Well that's the problem there's only two options, but never fear fellow denters there is a simple way to overcome this problem.

In the spirit of this blog, I always try to keep everything open source, I'm going to link the accounts using brdcst.it a free, open source project by Michele Azzolari or @macno on identi.ca. Whilst brdcst.it is a free service; you need an invite, ask @macno on identi.ca who, for those who don't know him, is very obliging and helpful.

Once you have received your invitation log in to your new account at brdcst.it We'll do the destination first, trust me it's easier. I'll now break this into steps to make it easier to follow.

Before we can setup brdcst.it properly, we need the feed for your Diaspora posts.

1. On Diaspora, when you are about to make a post, you should see a text box similar to the one shown below:
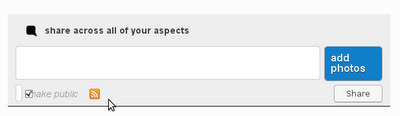


Click on the orange RSS icon.

2. This will take you to a new page showing all your posts, take a note of the address:
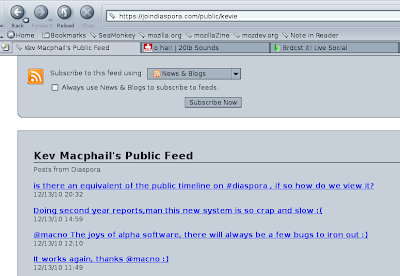


In this example my address is https://joindiaspora/public/kevie
*if there is .atom at the end of the address then leave it off

3. Go to the brdcst.it website.

4. On the welcome screen you'll see the number of feeds and destinations you currently have setup. Click on Add/Edit beside destinations, this will lead you to a new screen.

5. Click on Add new destination

6. Click on Identica

7. This will take you to identi.ca, log in (if necessary) and the site will display the message:
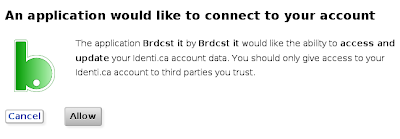


Click on Allow

8. Now go back to brdcst.it, this time click on Add/Edit beside feeds

9. In the first box add the address of your Diaspora feed that we noted in step 2. In the second box give this setup a name (I have imaginatively called it 'diaspora')
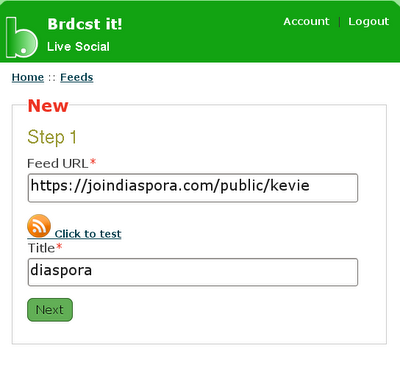


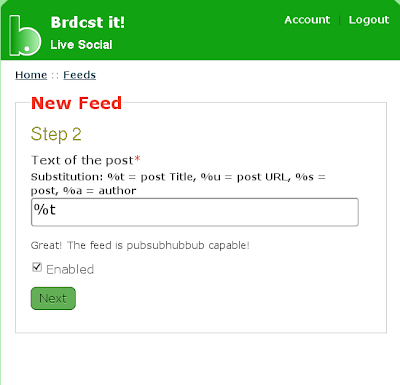
10. Now it's time to choose what you wish to export, for text only enter %t, if you want a link to be posted then add %u (only needed if your posts exceed the 140 character identi.ca limit)


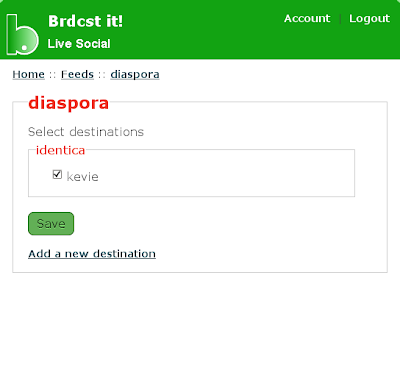
11. On the next screen, put a tick beside your identi.ca username and click on Save


12. Now log out of brdcst.it and your done, your posts from Diaspora will be updated on your identi.ca timeline.

Please note that when you post on Diaspora you must tick the box make public for it to be posted to identi.ca

Saturday, 27 November 2010

Gentoo DVD drive setup problems

This is not meant as a guide that will fix everybodies DVD/CD problems, it was the solution that worked for me, if you still have issues then I recommend consulting the Gentoo Forums.


After gaining some recent bad advice from a 'well meaning' helper on a forum I recently managed to totally render the portage setup useless to the point where I couldn't install anything. After hours and hours of consulting with others on line and attempting a variety of fixes, the conclusion was reached that I would probably be just as quick rebuilding Gentoo from scratch.

Having completed this task already in November 2009 and with a years experience under my belt and a lot of extra libraries etc on my machine I figured that a fresh install would have my Gentoo system running even faster.

The first time I compiled my first Gentoo OS I made a lot of written notes, these were very useful and I would highly recommend anybody starting Gentoo for the first time to do this as these were invaluable the second time around. These can save time and help avoid falling into the same pitfalls twice.

Upon launching into my new Gentoo system complete with Gnome graphical environment I thought that everything was just about back to normal. One major problem though: both of my DVD drives were listed as Unnamed Drive. Neither were behaving like a DVD drive, any time I tried to eject they simply shut again immediately and I couldn't use any programs that made use of the drives eg Brasero, mplayer etc.

To compile the kernel I took the chickens way out and used Genkernel so I assumed that a lot of the default settings would be right and that the Gentoo Handbook would guide me. At this point can I please state that the Gentoo Handbook is an invaluable, well written guide when installing Gentoo. However there is one point that needs updating:

When using Genkernel with IDE drives the default setting selects:
Device Drivers ---> <*> ATA/ATAPI/MFM/RLL support (DEPRECATED) --->

This is obsolete and causes problems with udev which is designed to make your life easier. For udev to function properly we need to move to libdata. As I had already created the kernel I had to edit it by typing the command:
genkernel --menuconfig all

To rectify this I removed the * by highlighting it and pressing N.
Secondly I moved the cursor down to highlight
SCSI device support --->

and setup as follows by pressing Y to select (* will appear) or N to deselect

│ │ < > RAID Transport Class
│ │ -*- SCSI device support
│ │ < > SCSI target support

│ │ [*] legacy /proc/scsi/ support

│ │ *** SCSI support type (disk, tape, CD-ROM) ***
│ │ <*> SCSI disk support

│ │ < > SCSI tape support
│ │ < > SCSI OnStream SC-x0 tape support
│ │ <*> SCSI CDROM support
│ │ [ ] Enable vendor-specific extensions (for SCSI CDROM)
│ │ <*> SCSI generic support
│ │ < > SCSI media changer support
│ │ [*] Probe all LUNs on each SCSI device
│ │ [ ] Verbose SCSI error reporting (kernel size +=12K)
│ │ [ ] SCSI logging facility
│ │ [ ] Asynchronous SCSI scanning
│ │ SCSI Transports --->
│ │ [ ] SCSI low-level drivers --->
│ │ < > SCSI Device Handlers --->
│ │ < > OSD-Initiator library


I know that your thinking, wait a minute, my drives are IDE/PATA not SCSI. The IDE command set was evolved from SCSI and is now being merged back with it.

now exit genkernel and wait for a few minutes for it to complete. Then I entered the command:
nano -w /etc/fstab

Now comment out anything that includes the DVD/CD drives by placing a # at the start of the line. Then change all of the drives labelled hda, hdb, hdc... etc to sda, sdb.sdc.... etc. If you have a combination of IDE and SATA then the IDE will be labelled first and the SATA drives second. So if you previously had 2 IDE and 2 SATA drives then previously they may have been labelled hda, hdb, sda, sdb. However this will now be changed to sda, sdb, sdc, sdd with your IDE drives being labelled sda & sdb and your SATA drives now getting labelled sdc & sdd. Exit and save.

Finally the last step is to modify your GRUB menu entry if you've set a separate partition for /boot.

If you are using Grub Legacy then type:
nano /boot/grub/menu.lst

On the line it will have the command The (real_)root=/dev/hda... this will need to be changed to /dev/sd...

Restart your system and all of your DVD/CD drives should now be functioning as expected. This problem caused me three days of grief. Hopefully it may provide the answer that some of the other users may be looking for.

Thursday, 18 November 2010

Customise the Gnome menu icon

After a recent major error forced me to rebuild my Gentoo system, I was reminded of some of the small annoyances. Things that should be so easy, yet they can prove incredibly frustrating. One of these is the awkwardness of changing the menu icon in the Gnome desktop. I don't know why it cant be as easy as in the KDE environment; a couple of obvious clicks and then you are asked to select the new icon, dead easy.

First of all create the icon you want in my example I'm using Larry the Cow taken directly from the Gentoo site. Rename/save the file to start-here.png


The next step is to find the folder of the current icons your using. If your not sure which set of icons you have then click on system > preferences > appearance this will open up a window, select customise and then icons, note the name of the highlighted set.

The folder is /usr/share/icons/{name_of_icon_set}/22x22/places/ we need to move our icon into this folder, but the problem is that it is restricted access, so simply dragging the file won't work.

Open a terminal and navigate to our custom icon. Type:
sudo mv start-here.png /usr/share/icons/{name_of_icon_set}/22x22/places/

Some users have also had success putting the icon in the scalable folder instead of 22x22, if you wish to try this then simply replace 22x22 with scalable in the above command. Please note that the 22x22 is a size, the icon should have been resized previously to 22x22 pixels.

So the file is in position and nothing happens, you can even restart and there will be no effect. We need to input a couple of commands before it will change:

sudo gtk-update-icon-cache --force /usr/share/icons/{name_of_icon_set}

and finally:

sudo killall gnome-panel

The screen will flicker and you should have your customised menu icon.


Saturday, 23 October 2010

Jamendo - download Ogg files directly

*****Due to Jamendo restructuring it's file archives, this method no longer works in order to obtain albums in ogg vorbis format, I will post an update when I find an alternative method****** 

If your anything like me then you'll be very annoyed with the constant offer of an Ogg Vorbis torrent on Jamendo and then the severe lack of any seeders for the album. Indeed I've one album in particular that I've been trying to download now for 6 months without a single seeder. Given that the files are there, the lack of seeders is very frustrating. However a solution is at hand: download them directly.

This does not appear to be an option from the Jamendo site, however I noticed that the Android app is able to download any album I want in Ogg format. After some research and questioning, there is a way to directly download the albums in Ogg Vorbis format to your PC.

It is not as simple as a one click, however it is not overly complicated.

1. First go to the page of the album you wish to download, in my example I'm using the band I reviewed in my previous blog post: Roads and Lakes by Crazy Evolution.


2. Take a look at the address bar, take a note of the numbers at the end. This is the Album ID, in this case 77507


3. Pace this into the address bar of your browser:
http://www.jamendo.com/get/album/id/album/archiverestricted/redirect/{album ID goes here}/?are=ogg3

so for my example to get the Crazy Evolution album it would be :
http://www.jamendo.com/get/album/id/album/archiverestricted/redirect/77507/?are=ogg3

4. From the pop up window select Save File and then click OK


Once your downloads have finished; sit back, relax and enjoy your music in a free format.


Thursday, 21 October 2010

Crazy Evolution - Roads and Lakes

A new band has appeared on the scene at Jamendo; Crazy Evolution. The band are stuck firmly in the punk rock genre, there is no grey area here. This is a genre that you either love or hate and this is right up my alley.

Drawing on influences from a variety of bands such as The Offspring, Sum 41, Blink 182, Bowling for Soup and a variety of others, Crazy Evolution have produced a great début album; Roads and Lakes.

The guitars and drums are top notch and the singing and backing vocals are very well performed throughout. This band would not appear out of place on a best of punk rock album with some of the bands mentioned earlier.

Whilst this genre does get pigeon holed to the skateboarders of society, the cover does little to help this stereotype, this is album is definitely worthy of a listen.


Jamendo Page
Official site
MySpace Page

Sunday, 17 October 2010

geek test results

My computer geek score is greater than 83% of all people in the world! How do you compare? Click here to find out!

Overall, you scored as follows: 16% scored higher (more computer geeky), 1% scored the same, and 83% scored lower (less geeky).

Compared to those in the same age group as you: 23% scored higher (more computer geeky), 1% scored the same, and 76% scored lower (less geeky).

What does this mean? Your computer geekiness is: High-Level Computer Geek. All of those below you are envious of you! (...Well perhaps not the cool people)

Saturday, 16 October 2010

Removing Facebok & Twitter from the Nexus One


*This guide will not work with Android 2.2.1, Universal Androot is not compatible with 2.2.1 due to root restrictions

**If you are not confident with using the terminal please do not do this, I am not responsible for any damage to the phone


A lot of posts have been written on various forums about removing some of the default apps that come supplied with the Nexus One phone. Two that particularly grate on me is the automatic inclusion of Facebook and Twitter apps, I do not have an account with either and neither do I want one.

Given that Android is based on a Linux kernel then it should all be about freedom, so removing these was high on my list of priorities when I received the phone. As Android is based on Linux then you can use the same commands that most Linux users use on a day to day basis in the terminal.

First of all, from your Nexus One, select Settings > Applications and make sure that there is a tick beside Unknown Sources. This allows us to use software other than the apps in the market, very useful for trying beta packages that are not yet in the marketplace (Fennec etc).

We now need root privileges. Most ways of rooting your phone affect the bootloader and the mobile companies claim that this nullifies your warranty. I am using Universal Androot which can be downloaded here or by scanning the barcode below, this grants root privileges to applications, not your bootloader, so a factory reset should wipe this out.


Install the the app, make sure the Android version is set to 2.0~2.2 and click Go Root. The next screen should give you the message: Woot! Your device is rooted!

Now go to the marketplace and download a terminal, I used the Android Terminal Emulator; it does the job and it's free, but feel free to choose any you wish.

Open the terminal and type:

su

An Android head with crossed bones below it will appear asking if you wish to grant this application Superuser permissions, select Yes. At this point I had to restart the terminal app, but this may not be the case for all of you.

Now type, pressing return at the end of each line:

mount -o remount,rw -t yaffs2 /dev/block/mtdblock3 /system
cd /system/app
ls


At this point you will get a list of all the pre-installed packages, they will all have .apk extensions. Take a note of the exact names of the package files you wish to remove. Please be careful not to remove apps that are necessary to the basic function of your phone. We will rename these instead of deleting them, this means that we can retrieve them later if we wish. In my example I will be removing the Facebook and Twitter apps:

mv Facebook.apk Facebook.bak
mv Twitter.apk Twitter.bak
mount -o ro,remount -t yaffs2 /dev/block/mtdblock3 /system
sync

Now exit the terminal and reboot your Nexus One and the unwanted apps will be gone.